Monday, October 28, 2013

Beefy and Hearty Two Bean Chili and Biscuits

Beefy n Hearty Chili with Bacon, Cheddar Jack and Garlic Biscuits

I know, tis the season to make chili!  The days days have gotten short, the shadows long by five o'clock, a crisp chill sets in after sundown, and you just want to sit down to a hearty, hot bowl of soup or chili.  In this recipe, i am sharing a quick and easy of my dad's chili.  I have omitted some of the ingredients he used in favor of ingredients I like.  I do make variations of this chili, however, like my dad did, and I will offer those variations as we go along. My dad's chili was a day-long project, but mine is less than two hours.  Ready?  

Here's the starting line-up:

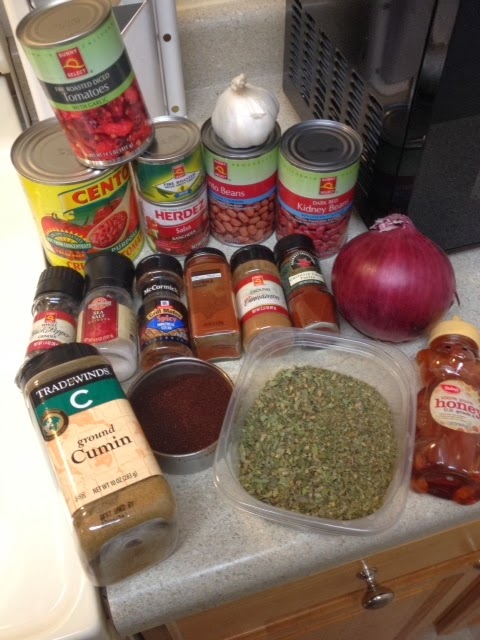
  This recipe calls for two pounds of lean ground beef (93/7%)
1 large onion, chopped
3 cloves garlic, finely chopped
4 slices thick cut bacon, chopped
1 tablespoon dried oregano
2 tablespoon pasilla chile powder
1 teaspoons chipotle powder
1.5 teaspoons cumin powder (or, one teaspoon cumin seeds and one teaspoon powder
1.5 tablespoons smoked paprika
1/2 teaspoon cinnamon powder
1 teaspoon steakhouse seasoning
salt and pepper
1 4 ounce can of diced roasted green chiles
1 28 ounce can crushed tomatoes
1 8 ounce can of fire roasted tomatoes
1 4 ounce can salsa ranchera
1 can dark red kidney beans, drained and rinsed thoroughly
1 can white pinto beans, drained and rinsed thoroughly
1 or so teaspoons honey
Juice of one lemon or 2 limes
1 box or can of chicken stock or broth (2 cups)

In a high-sided pot over medium-high heat, add the chopped bacon.  Season the bacon with a little pasilla pepper and ground black pepper. I always season bacon.  My secret to extra flavor!  When the bacon fat has rendered, remove all but about a tablespoon of the fat. If you think you might want to use it later or for something else, put it in a mason jar and refrigerate or freeze it.  Just a little tip.  It is great for sauce starters!  Add the two pounds of ground beef to the pot and brown.  Add the onions to the meat when it is about half way browned, adding salt to bring out the moisture of the onions.  Add black pepper, as well.  Add the garlic as the onions soften and start to become translucent.  Incorporate all of the above well.  Next, add the tomato products and the roasted green chiles. Stir thoroughly.  Next, add the salsa ranchera, the chicken stock and the spices.  Stir thoroughly.  Allow the mixture to come to a boil. Add the two cans of beans, drained and rinsed thoroughly, and stir them in well. When the chili comes to a boil again, reduce to a gentle simmer, partially cover and allow to simmer for an hour and a half.  Two hours, if you can. 

Now, my dad would use ground sirloin as well as a fresh, nicely marbled New York steak, which he first seared and then sliced into small bite-sized chunks.  My dad also used dry beans and washed them thoroughly and soaked them overnight.  He never used canned beans.  He often used fresh bell peppers.  I do not remember for sure, but I think he finely diced a jalapeno pepper, as well.  He also used tomato paste and, I am pretty sure, ketchup.  I would rather use more crushed tomatoes than paste and ketchup.  I would rather sweeten the chili by using honey to offset the spicy heat of the chili powders. That is just me.  You must use whatever method you prefer, or, whatever you have in your cupboard! I do!

Ready for the biscuits?  I have been making my biscuits from scratch, but, honestly, they are a little too dense, so I am going to give you my fall-back recipe.  To a large bowl, add 2 cups of Bisquick, 2 cloves finely grated garlic, 1/2 cup finely shredded cheddar jack cheese, 1-1.5 cups buttermilk, half a stick of ice cold butter, chopped into small cubes, and 1/2 cup of crispy peppered bacon, crushed into tiny bits after cooking. Combine the mixture thoroughly without overworking the dough. Using a biscuit cutter, cut out 1.5 inch circles and place onto an ungreased baking sheet. Bake at 420 degrees for eight to then minutes, until golden brown on top.  Tip, brush the top with a little melted butter to enhance that golden brown, flaky biscuit top.  


 The dough smells amazing.  You can see the cheese and bacon bits.


 By now, the chili should be done.  Ready for that aromatic, warm, spicy comfort food?  Dip your biscuits in the chili sauce and enjoy the warmth of the garlic, bacon and cheese in the biscuits vs. the heat and spice of the meaty chili.  Top the chili with a sprinkle of cheese and tear up some cilantro or parsley and serve.  Such a happy, fulfilling meal.  Hope you enjoy it!


 One of my favorite photos ever.  The Jack Skellington mug is in honor of my son, Jack, who loves all things Disney.  This meal was for him!

Saturday, October 19, 2013


Speedy Verde Carnitas and Puerto Rican Chicken with Corn and Roasted Tomato Salsa
Another Installment of my College Food Series

At first, I was not going to include these recipes in the College Food Series, but they are both so darn easy, any college student can make this during an hour of studying for mid-terms or paper-writing day.  Both take about an hour, ingredients are minimal, effort is also pretty minimal, cost is low, and flavor is HUGE!!!  Being that these are spicy with warm Mexican flavors, these are fantastic for cool fall evenings or cold winter days. 

Let's start with the Puerto Rican Chicken with Corn and Roasted Tomato Salsa.  

This recipe can be made with almost all-canned ingredients, but it can also be kicked up a culinary notch.  For the sake of College Foodies, let's stick with the easy basics.  Here's the starting line-up:

1 package of mixed chicken thighs and drum sticks
1 medium yellow or red onion, chopped (or, 1.5  tablespoons onion powder)
3 cloves garlic, finely chopped (or, 1.5 teaspoons dried minced garlic, or garlic powder)
3 full tablespoons of Paprika
1 tablespoon dried oregano (crush between the palms of your hands)
1 28 ounce can of crushed tomatoes
1 14.5 ounce can Fire Roasted tomatoes
1  4 ounce can fire roasted green chiles
1 8 ounce can corn, drained
salt and pepper, about a 1/2 teaspoon each
3 tablespoons extra virgin olive oil (or your favorite oil)
2 cups chicken broth/stock, or water

Remove the chicken from the packaging and sprinkle liberally with the tablespoons of paprika.  If you are using granulated onion and garlic, season the chicken parts with a teaspoon of each, and also season with salt and pepper.  Add the oil to a high-sided pan over medium-high heat.  When the oil begins to ripple, it is hot enough to sear the chicken.  Place the chicken in the pan and sear each side for about five minutes.  Remove the chicken to a plate, cover with foil, and add the fresh onion and garlic to the pot.  Stir and allow the onion and garlic to become nearly translucent.  Add the can of green chiles and the can of drained corn.  Stir in thoroughly, scraping the bottom of the pan to get up those browned bits of chicken.  That is amazing flavor for your sauce!.  Finally, add the two cups of chicken broth or stock (low sodium!) or, if your student does not have that on hand, which they probably won't, add two cups of water.  Stir everything together, turn the heat to high, and once it begins to boil, reduce the heat to medium-low and follow the directions below to bold font spice alternative.

*Note:  If you are using only powdered or granulated onion and garlic, add the tomato products to the high-sided pan first, stir, and then add the rest of the seasonings and mix thoroughly. 

Nestle the chicken back into the pot just beneath the sauce level.  Partially cover the pot and allow it to simmer for 45 minutes.  Remove the lid after 45 minutes, and over medium heat, now,  let it simmer for another fifteen minutes. Carefully remove the chicken (which may start to fall apart now due to the braising process) to a serving plate or bowl, and allow the sauce to cook over medium-high for about five more minutes to reduce it further.  Stir thoroughly to scrape up the browned bits on the bottom of the pan.  Flavor!!!

Turn off the heat and ladle heaping spoon fulls of the corn and roasted tomato salsa over the chicken.  This will be messy, as you will want to use your hands as well as a spoon at some point!  Aromatic, inviting, warm and pleasantly spicy, this dish is sure to comfort any college student (or, Anyone!) during a long day of studying or paper-writing.  

 Top with cilantro as a flavorful, fresh garnish and sprinkle with your favorite cheese!


I made this next dish for my son up at Sac State last week, and I was thoroughly pleased that he enjoyed it so well there were no leftovers.  I'd had just oven an hour and a half to make it, but from prep to serving, I did not need even that much time.  Here is my Speedy Verde Carnitas!

Here is what I brought up to Sacramento with  me: 

1 one pound package of pork butt/shoulder cut into one-inch cubes
2  four-ounce cans of diced green chiles
2 eight ounce cans of Verde sauce
1 8 ounce can of corn (optional)
1 box of low sodium chicken stock (although two cups of water will be fine)
3 cloves finely chopped garlic (or 1.5 teaspoon granulated or dried minced garlic)
1 red or yellow onion, chopped (or 1.5 tablespoons granulated onion or powder)
1 teaspoon salt and 1 teaspoon black pepper
3 tablespoons extra virgin olive oil (or your favorite oil)
Your favorite cheese for a topper

Over medium-high heat, add the olive oil to a high-sided pot or pan.  While the oil is heating, season the pork with salt and pepper.  If you are using all granulated seasonings, season the pork with a little onion and garlic powder, too.  Save the rest for the sauce.  When the oil begins to rippled, add the pork to the pan and allow it to sear about seven or eight minutes, until golden brown.  Do not try to continuously move the pork around.  As it cararmelizes, the sugars in the meat with release it from the hot pan. Then it is okay to stir it around. Once the meat has browned, and if you are using fresh garlic and onion, add those now.  Otherwise, save the garlic and onion until the wet ingredients have been added to the pot or pan.  Add the verde sauce and the cans of roasted green chiles and stir to thoroughly incorporate. *Now add the powdered seasonings, if you are not using fresh ingredients. Once more, stir thoroughly to allow those wonderful flavors to marry with the sauce.  Delicious. 


At this point, turn the heat to high, and when the sauce begins to boil, partially cover and reduce the heat to medium-low to simmer.  Let the carnitas and sauce simmer for 45 minutes to an hour.  Uncover and simmer for another fifteen minutes.  


 You could serve with cilantro as another splash of fresh color and flavor!  This meal is warm, tangy, and one of the easiest comfort foods Ever.  I cannot wait to make this in a more traditional manner and cook it low and slow for four or more hours.  But for our college students, this is speedy, easy and comforty. 

Thank You for your time and consideration, folks!


Saturday, October 12, 2013


Fried Egg and Bacon Bistro Sammy


So it is Sunday morning, or a vacation morning, you are still a little sleepy, and you are seriously hungry, but you do not have a ton of energy or time to expend on breakfast, or, as I call this sammy, a "brunchwich".  I have Just the sammy for you! 

This sammy takes less than thirty minutes, and before long, you will be having a party in your belly.   Here's what you do....

Fry up three slices of thick smoked bacon, or six, if you are feeding two.  Oh heck, eight!  Two more to snack on for the cook! If you really want to add flavor, sprinkle the bacon with powdered garlic, paprika or chili powder, and crush up dried oregano and sprinkle it over the bacon.  This is one of my secrets to adding flavor to many burgers and pastas, and now, sammies.  Meanwhile, wash and dry your favorite greens, such as baby spinach, baby arugula or even baby kale.  Hey, this has to have some health benefits!  Toast a roll or your favorite bread (I had Asiago Buns left over).  Add your favorite condiments, or not.  Remove the bacon, drain most of the rendered bacon fat, keeping enough for the eggs.  Fry on or two eggs per sammy, and however you like them.  My mom likes her eggs for sammies over easy, but I like mine over hard. Assemble your sammy however you wish.  I placed the arugula on the bottom, the egg atop that, bacon atop the egg, sprinkled with finely shredded mozzarella cheese.  I added a mixture of stone ground mustard and mayo to the top of my sammy bun.  So good!  Make this your own.  It took me no more than twenty minutes to make, and only moments to devour.  Enjoy!

Do you see the vulture in this picture?
My little dog GusGus is "vulturing".  


Hawaiian Spammy Burger

This is one of those dishes where ingredient planning is paramount.  I will relate to you soon the huge mistake I made regarding the construction this burger.  The taste of it was amazing, albeit it a little saltier than I'd wanted it to be, but overall, the flavors of a Hawaiian Lunch Plate are captured in this burger.  I hope you will try it, make it your own, and enjoy it as much as I did.  Just do it better than me!

Here's my wave of ingredients:
1 pound lean ground beef and 1 pound ground pork
1 can of SPAM, chopped into small cubes
1/2 red onion, finely chopped
2 tablespoons fresh grated ginger, separated (I freeze my fresh ginger, which allows it to last about forever)
2 + 2 cloves garlic, finely chopped, and separated
2 tablespoons of Hoisin sauce, separated into thirds
1/4 cup Teriyaki sauce (store bought is just fine, but you could always make your own!)
1 eight ounce can chunk pineapple
8 small slabs of pork belly
King Hawaiian Burger Buns
2 tablespoons extra virgin olive oil
2 eggs
Cheese of your choice  (I would use a smoked cheddar, gouda or mozzarella)

Garlic Sriracha Aioli
 1/2 cup mayonnaise or plain Greek yogurt
1 large clove garlic, grated
1 tablespoon Sriracha
Greens of one scallion, finely chopped
1 teaspoon fresh grated ginger
*Combine the above ingredients in a small bowl, mix thoroughly, and place in the refrigerator to allow the flavors to marry.  If you make this a day ahead of time, the flavors will be bolder and better!

 In a cast iron skillet, add a drizzle of extra virgin olive oil (evoo) over medium-high heat. When the oil begins to ripple, add the slabs of pork belly.  Allow the slabs to crisp, above four minutes per side.  Add a drizzle of Teriyaki sauce just before you turn the slabs.  Add another drizzle of Teriyaki sauce when the other side begins to crisp up.  When fully glazed and crisped, remove the slabs onto a plate lined with paper towels and set aside, covered to keep them warm.  

Now, add another drizzle of evoo, this time, about two tablespoons around the cast iron skillet.  Add the red onions, ginger and garlic when the oil ripples and saute', about five minutes, until the onions begin to soften. Move the veggies off to the sides of the skillet, and add the chopped SPAM.  Add a drizzle of Teriyaki sauce and one tablespoon of the Hoisin Sauce to the saute'.  Allow the SPAM to crisp up and incorporate the veggies into the mix.  Remove the SPAM mixture to a large bowl and allow to cool in the refrigerator.  


Now, this is where I made my huge mistake.  A friend and I made these burgers a couple of summers ago, and I'd forgotten about using two pounds of meat for these burgers, this time.When the SPAM mixture cools, blend it, along with the one drained can of chunk pineapple and the other tablespoon of Hoisin sauce, in a food processor or blender, and add it to a large bowl with the two pounds of meat.  *My problem was that I had only one pound of meat, so my ratio of soft SPAM and veggies to ground beef was far too off, so my mixture was loose and gloppy.  Yes, I said "gloppy".  I had the bright idea to add two eggs, which helped to geld the mixture together a little bit after I'd formed them in to burgers.  It was not enough, however, to stop it from being a loose mess .  My solution?  Pour all of the wonderfully smelling meat and veggie "gloppy mess" into my cast iron skillet and bake it at 400 degrees for 45 minutes. After 35 minutes, I'd topped the giant burger with mozzarella cheese (I'd wished I'd had smoked cheese, cheddar or mozzarella, or gouda) which also helped to keep it together.  The baking idea did the trick. Thank goodness!    I have said all along that my humble blog is a learning blog, and I sure did learn!

In a perfect world, however, you would have about eight burgers, dented in the middle, to allow a flat surface, as it will plump while cooking, which you could grill or fry, and top with the cheese of your choice.  I, personally, and I do not know why, because I love pineapple, do not like a round of grilled pineapple atop my burger.  Don't hate, as I still used pineapple in my meat mixture!  I loved the tangy, sweet taste it brought to the meat mixture.  You would add the spicy aioli to your Hawaiian burger buns, add the greens of your choice (I used baby arugula), add the glazed pork belly atop your burger, and "Aloha"! Enjoy a majorly flavorful meaty burger dripping with Hawaiian goodness.  

Aloha and Mahalo!


Chicken Paillard with Grape Salsa and Roasted Broccoli

 If you are in need of a healthy and quick mid-week or fancy dinner for family or friends, Chicken Paillard with Grape Salsa is for you!  Easy, healthy and above all, pretty painless, this recipe is satisfying of all palettes.  While boneless, skinless chicken breasts, butterflied, are normally used for this dish, I love chicken thighs, so if you are set on using chicken breasts, go for it!  It is also great if you are on a low sodium diet.  Here is my version of Chicken Paillard...

Ingredients
1 package of six to eight boneless, skinless chicken thighs 
1 clove garlic, smashed and 2 cloves garlic, finely chopped
1/2 a red onion, finely chopped, separated in half
1/2 cup red seedless grapes, halved at an angle
1.2 cup green seedless grapes, halved at an angle
1 finely chopped Fresno chile
1/4 cup Italian Flat Leaf Parsley, finely chopped plus a little coarsely chopped parsley, set aside for garnish
Extra Virgin Olive Oil:  3 tablespoons for the marinate, 2 tablespoons for the skillet
1/4 teaspoon salt and pepper each to season the chicken before marinating
Juice and zest of one lemon, separated in half
1 tablespoon red wine vinegar or champagne vinegar
Splash of white wine
Roasted Broccoli Side Dish
1 head fresh broccoli, chopped into half trees
2 cloves fresh, grated garlic
1 - 2 tablespoons extra virgin olive oil
pinch of salt and pepper
2 tablespoons shaved parmesan cheese for topping after roasting

Preheat your oven to 400 degrees.  Remove the chicken from its packaging and add salt and pepper to both sides.  In a medium bowl, combine three tablespoons extra virgin olive oil, the red wine vinegar or champagne vinegar, the smashed clove of garlic, half of the chopped red onion, and half of the lemon juice and zest.  In a gallon sized zip-lock bag, add the above ingredients and add the chicken to the bag.  Push out as much air as possible and zip closed the bag.  Move the chicken around the marinade to make sure the flavors work on each chicken thigh.Place the marinating chicken in the refrigerator for about thirty minutes.

Meanwhile, wash and chop the broccoli and lay the florets on a baking dish or in an oven-safe skillet. When you are ready to cook the chicken, toss the florets in the extra virgin olive oil, salt and pepper and fresh grated garlic.  Redistribute the florets and roast for twenty minutes at 400 degrees, until the florets begin to blacken and crisp.  Your nose will tell you when the broccoli is done, as the garlic aroma will permeate your kitchen in a most happy way.  


While the broccoli is absorbing that delicious garlic flavor via the extra virgin olive oil and the chicken is marinating, time to make the fresh grape salsa.  Keep in mind, this salsa can either be cooked into a sauce or served cold and fresh atop the chicken.  I love it either way.  

In a medium bowl, add the grapes, extra virgin olive oil, the other half of the lemon juice and zest, the finely chopped garlic, the other part of the red onion, the finely chopped Fresno chile, the quarter cup of finely chopped Italian Flat Leaf Parsley and the splash of white wine. I used white wine because the first time, I sauteed this salsa.  The second time, I served it fresh.  If you serve the salsa fresh, grate one clove of garlic, instead of two finely chopped cloves of garlic.  Allow the salsa to sit in the refrigerator after stirring thoroughly to allow the flavors to marry.  Actually, the longer it sits, the better, so if you make this even a day ahead of time, it will be great.  


***One mistake I made was to add finely grated parmesan cheese to the salsa, which made it grainy.  The second time I made this dish, I used shaved parmesan as a topping, which worked much better.  Lesson learned! Isn't that what it's all about?

Finally, when you are ready to fry up the marinated chicken, place the broccoli baking sheet or oven-safe skillet to the oven for twenty minutes.  

Add about two tablespoons (two rounds around the skillet) extra virgin olive oil to the skillet over medium-high heat.  If you want to grill your chicken, grilling adds a fantastic flavor to the overall dish.  Just thought you diligent grillmeisters out there might want to know that.  Remove the chicken from the bag with tongs and add each chicken thigh to the skillet, inner-meaty side down.  Dispose of the marinade and the bags safely and wash your hands carefully.  Safety first!  Saute' the thighs about four minutes per side.  Do not move the thighs for at least four minutes before turning.  Allow the meat to brown and caramelize. That is flavor!  The kitchen should be overflowing with the garlic aroma from the broccoli, and now with the marinate ingredients on the chicken.  You should be very happy about now!

Great golden color is what you are looking for!

Remove the chicken and plate, along with the broccoli, which should be done about now, or shortly.  If you are going to saute' the grape salsa, start with adding a splash of white wine, and, using a wooden spoon, scrape up the browned bits from the skillet and add the salsa.  Saute' for about four or five minutes, until the garlic is softened.  If you do not plan to saute' the grape salsa, remember to finely grate the one small garlic clove.  Well, unless you really like garlic, cooked or not.  I leave that to you.  

After allowing the chicken to rest a few minutes, top with the grape salsa, sauteed or cold, and serve with the broccoli, topped with shaved parmesan cheese. The parm adds a nice salty bite to the sweet bites of the grapes. Crown the Paillard with the remaining coarsely chopped parsley.  This dish is dreamy, let me assure you.  

Enjoy!  Thank you for your time!

Sunday, October 6, 2013

Chipotle Bacon Chile Cheese Burger
By:  Martin Phillips


Ingredients for the Burger
2 pounds ground beef; one package  93/7  lean-to-fat and one 80/20 lean-to-fat ratio
½ sweet Vidalia onion, finely chopped
*the other ¾ onion sliced and soaked in a bowl in almond milk
2 cloves garlic, finely chopped or grated
8 slices of bacon
1 ½ cups chickpea flour
2 cups canola, vegetable or grape seed oil
2 Poblano chiles, roasted, peeled, seeded and sliced into halves
1 ball of Oaxaca cheese, sliced
¼ teaspoon Hickory Smoke (liquid smoke)
½ teaspoon Chipotle powder
½ Chipotle in Adobo
1 teaspoon salt
1 teaspoon pepper
½ teaspoon dried oregano*
½ teaspoon cumin seed*
½ teaspoon coriander seed*
3 cups fresh baby Arugula


Aioli Ingredients
1 teaspoon salt
1 teaspoon pepper
1 – 2 tablespoons Worcestershire sauce
½ tablespoon aged Tamari sauce
1 tablespoon stone ground mustard
½ tablespoon Chipotle in Adobo
1 /2 cup of Mayonnaise
½ teaspoon cumin seed, ground
1 teaspoon finely chopped garlic
¼ teaspoon Sriracha sauce
1 tablespoon extra virgin olive oil
The juice of one lime
*1 tablespoon bacon grease from baking the bacon.  Unhealthy, yes. Good, absolutely!


In a medium sized bowl, combine all of the ingredients for the Chipotle Aioli and whisk thoroughly to combine all of the ingredients.  Set the bowl in the refrigerator until service.

Preheat the oven to 375 degrees.  Place a rack on a baking sheet and lay the bacon slices on the rack.  Season one side with a sprinkle of the following:  garlic powder, paprika and Chipotle powder.  Cook for eight to ten minutes, turn, season, and cook for eight more minutes.  Remove and place the bacon on a paper towel to drain.  Reserve a tablespoon of the bacon grease.  Once all eight slices are done, cover with foil and set aside.


Meanwhile, change the oven temperature to 400 degrees.  Toss the washed Poblano chiles in a little extra virgin olive oil and place them on the baking sheet and rack the bacon had been baked on.  Roast for approximately eight minutes, turn, and allow to roast for about eight more minutes.  If the skin of the peppers appears charred, they are done.  If not allow them to roast until the skin is charred.  Remove them, place in a plastic zip-lock bag and allow to steam and cool.  After fifteen minutes, remove the peppers, and remove the skin.  It should peel off very easily.  Remove the stems, slice in half, seed the chiles, and slice them into halves again.  Each pepper should yield four quarters.  


Slice the Oaxaca cheese into round slices and set aside in the refrigerator. 

In a large bowl, combine all of the burger ingredients.  *Using a spice grinder or mortar and pestle, grind the dried oregano, coriander seeds and cumin seeds and sprinkle over the ground beef.  Using your hands, fold in the onion, garlic, sauces and spices until thoroughly combined.  Score the meat so you will have six burgers.  If you want them larger and you have an odd number of people to feed, make five burgers, which will be slightly larger. 

Heat a cast iron skillet or grill plate over medium-high or high heat.  You will not need to add any oil.  Add the first three burgers when the skillet is very hot. They will sizzle and smoke.  Allow the burgers to cook about four to five minutes per side.  I only add three as I do not want to crowd the burgers.  When the burgers release easily, they are ready to turn, again, in about five minutes.  Remove the first three burgers when they are done and cook the next three.  Place a foil tent over the first finished burgers and place them in the oven at 200-degrees to keep them warmed.  When the final three burgers are done, place all six (they will fit, now) into the cast iron skillet or the grill plate.  Top each burger with a Poblano chile slice, and top that with a slice of the Oaxaca cheese.  Place the skillet back into the oven to allow the cheese to melt.  This, however, can also be done on the stovetop with the foil or with a skillet cover.

Simultaneously, heat the oil for the fried onion strings to 350 degrees.  Remove the onion slices bowl from the refrigerator and set beside the skillet or deep fryer.  Add the chickpea flour to a large plate and add a teaspoon of Chipotle powder, garlic powder, ground coriander and cumin seed, along with a teaspoon or so of salt and pepper, each.  Using a fork, mix the spices into the flour.  Remove some of the onions and coat with the flour.  When a wooden spoon begins to bubble in the hot oil, you are ready to fry up the onions.  This is a flash fry, so the onions will take less than three minutes to thoroughly become golden brown.  Cook the onions in batches and allow them to rest on a large plate covered with paper towels.  Add a little salt to each batch. 


Meantime, prep your buns.  I use Asiago cheese buns, but you can use Kaiser rolls or whatever buns you like.  Here is how I build this burger:  A little sheen of the aioli on the bottom bun, place the cheese burger atop that, followed by that seasoned bacon. On the top bun, slather the aioli, liberally, place the arugula over the burger, and the fried onion strings atop the arugula.  Crown the burger with the bun and enjoy your masterpiece!   


Thank you for your time!

One Skillet Hoisin Chicken Stir Fry Over Noodles

  One Skillet Hoisin Chicken Stir Fry      Over Noodles This is one of those "people who know me Know I am obsessed over Chinese food&q...